
Wednesday, January 1, 2014
So Many Projects, So Little Time!
It is time to make a master list of all of the UFOs in my studio, and tucked into corners of many of the rooms in our home! I uncovered some of them when I was organizing the studio for my sons visit home during the holidays. The studio shared space as a bedroom, and a gift wrapping station! Now that 2014 is here, I am cleaning the studio, and organizing things.....at least 8 in progress knitting projects, handspinning wool and yarn samples had to go into the attic in newly marked plastic tubs, to make room in the studio for me to sit at the sewing machines! And, my cutting table has been a catch all for weeks....so, now I will begin the task of catalogueing these projects and putting them on deck for finishing. Alas, there are 6 or 8 new primitive stitchery projects I am ready to begin...so many projects, so little time! Here are just a few....

Studio!
The studio currently occupies our sons' old bedroom! Both of our boys are on their own, and the spare room is now seeing a new use, when not being used as a bedroom! It is a little bit tight, I cannot fit all of my floor looms in here, and my tapestry loom is still in the attic awaiting a space! But, I cannot complain, I feel fortunate to have at least a room to house all of the art supplies and textile materials that I have. I need to use the weather to my advantage, washing wool fleeces and doing large scale dyeing in the warm months out of doors. The winter is my time to create the projects with the materials I prepare during the spring, summer and fall, outdoors. There is not a spare inch of space in this room that I have not utilized. Two good books that I used to help me set up this studio area are "Dream Sewing Spaces" by Lynnette Raney Black...and "Organizing Your Craft Space" by Jo Packham. Both help you lay out the area you have to work with, and show options for supply storage, and efficient operating layouts to help you save steps and time!


Thrift Store Finds
A recent trip to the local thrift store yielded some great finds. I am collecting used wool blazers, skirts and slacks to recycle the fabric for colonial wool appliqué and rug hooking. I found 8 100 percent wool blazers for $4 each! What a find. I spent a couple of hours taking them apart, and washing the resulting fabric pieces in the washer and dryer to slightly shrink and fluff them. Then I put a few scraps into the dye pot with a little black and orange dye (I used my Greener Shades dye stock and a little citric acid). After a 15 minute simmer, they came out toned down, and the colors look very nice together. Over dyeing them this way marries the colors, and unifies the finished work, in addition to giving them that aged, antiqued appeal. You can see the before and after dyeing below.


Punch Needle Primitives
After a fun day fabric shop hopping with my sister and my mother, I became inspired to dig out my punch needle supplies and create a primitive sheep, in progress here. We visited a shop in Boxboro, Mass. Called "The Quilted Crow". It is probably the nicest shop of its type I have been to! There are lots and lots of beautiful cotton reproduction quilting fabrics to choose from, and dyed wool fabrics for the penny rug and wool appliqué lovers out there, as well as rug hookers, and beautiful samples of primitive punch needle work. This shop has kits and supplies for all of these colonial/primitive folk crafts. Once I finish this sheep, I will be working on a punch needle pattern that I purchased at The Quilted Crow, called "Tree Farm" (PN249, by Brenda Gervais at "With Thy Needle and Thread"). It is shown below. This pattern calls for Valdani thread, and I am substituting DMC cotton. There is no chart online for the color substitutions, so I am using my best judgement and looking at the cover photo to approximate the colors. I may use some walnut crystals to overdue it when I finish, if I feel the colors need to be toned at all. We shall see! I also purchased a wool appliqué kit, for a candle mat. Lots of things to keep busy over the winter months!


Tuesday, December 31, 2013
Lace Knitting Lessons
I am an art teacher. It is my chosen profession, and my main source of income. In addition, it is deeply satisfying on a number of levels to me personally, as an artist, and a human being. I love the energy, enthusiasm and joy the children bring to my classroom, and thereby, my life. My students drive me forward, as a teacher and an artist, to explore the what-ifs, and stay hungry for new knowledge. Did I mention that it is exhausting? Or that there are those days that things don't always go as planned? The days are, without a doubt, filled to the brim with unexpected turns, and lots of great art making. I wistfully think about what my life would be like as a full time fiber artist/shepherd , happily spending my days spinning, weaving, art quilting, tending the flock, and generally producing as many artworks as my heart desires. I, instead, plan and execute what I can during my non-teaching hours, after school, and on weekends and vacation time. I awaken at 4:30 a.m., have my ritual cup of jasmine jade tea, pore over my reading materials, which consist of several knitting, spinning and weaving magazines, art quilting and historic needlework publications. My most energetic hours are these, in the wee hours of the morning. After work, I prep dinner, do a little working out, and settle in for some light knitting or spinning, generally. Weekends and vacation time are for the bigger project set-ups, re-grouping and reflective activity that keep me focused. This photo is the most recent knitting project I have undertaken. It is a lace shawl. My first. What a challenge. I have discovered much about myself in this process. I have ripped back on many occasions, made plenty of mistakes, and gotten irritated to the point of putting the shawl away for weeks at a time so that I would not have to look at it, or deal with it. I have asked myself on numerous occasions, whether I really like lace knitting or not. I have finally discovered, half way through this ambitious project, that I need to "read" my knitting. If I can do that, I will make fewer mistakes and feel more enjoyment from the process, which is the reason we do this thing called knitting anyway, right? I also know that I cannot do this kind of knitting with any distractions. I need to be able to be totally enveloped in the shawl, thinking, living, breathing the shawl. Lots of counting, checking the rows that came before to use as a point of reference for my new row accuracy. Whew! I cannot wait to be finished, sort of the way a mountain climber feels once he or she reaches the summit! Worth all that hard work. And maybe the next shawl will not be as challenging, since I will have all of this experience behind me!

Monday, August 19, 2013
Dyed Leicester Longwool Fleece
The colors below were dyed on Leicester Longwool that I purchased in the grease at the New Hampshire Sheep and Wool Festival this spring. I scoured the fleece, then dried it on the screens. I used Greener Shades dyes, which come in a kit. I purchased mine from Knit Picks. It is about $35 or so, and the kit dyes up to 13 pounds of fiber. The directions leave a lot to be desired. I would not call the set of dyes a kit , at all, because of the lack of clear directions, but, nevertheless, the dyes are excellent, and I used Deb Menz's "Dyeing in the Kitchen" DVD to get me started with how to proceed with mixing the dyes up and using them. The colors are clear and strong, and very mix able. I obtained some clear, beautiful true colors when I mixed them together, and when toning them down with black, for deeper shades. I found it best to purchase a large plastic tub to put all of my dye supplies and equipment in. This way, when I want to have a dye day, all I have to do is pull out the tub, and everything I need is at my fingertips.


You will need:
A digital scale that can weigh In grams and pounds
Plastic table cover
Buckets
Measuring spoons
Smooth sided clear plastic cups
Colanders
Plastic knives or stirring implements of some kind
Sponges and rags for wiping spills
Rubber gloves
A thermometer
Pots with lids
9x13 roasting pan--good for casserole dyeing
Saran Wrap
Synthrapol
Stencil brushes (large work best)
Plastic syringes without the needle (you can get these at farm supply stores) that measure in milliliters or cc's (these are both the same)
Canning jar steamer kettle with wire rack insert
Dyes stock containers (I use the plastic disposables with good fitting lids, that hold 3-4 cups of liquid)
These items will get you started. You may wish to add others as you go. I store my tub in the basement, where it is cool, and I keep the extra dyestuff there as well, rather than in the attic. I keep a couple of old house screens in my basement to dry the fibers on out of doors on a sunny day. Most of my dyeing days are in the summer and fall, when the weather is nice, and I can make a mess outdoors and not have to worry about it! Then, I have beautiful dyed fiber to work with all winter long at my spinning wheel. The photos below show some of the rich colors I got on this fleece. I had to be very careful when dyeing these locks, felting can be an issue when working with them and the hot dye liquor! Avoid agitation, and you should be fine. I can't wait to card and spin some of these locks into yarns! I can envision some interesting art yarns with these....
Sunday, August 11, 2013
August Dye Day!
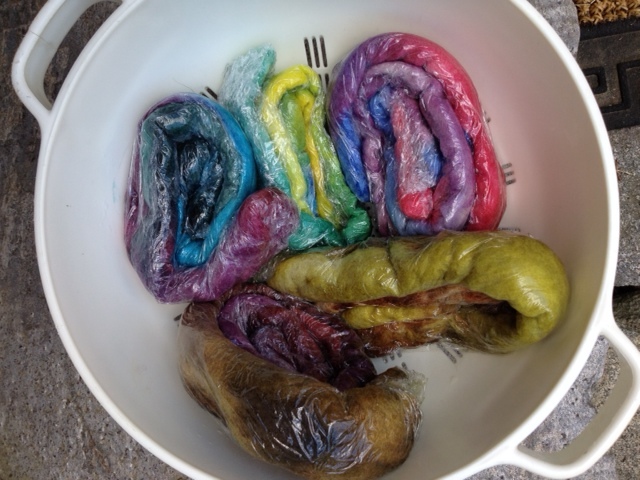
A sunny, dry day, perfect for outdoor dyeing. Today was so much fun, and I now have bags full of wonderful color ways to experiment spinning with! I used about 2/3 pound of 100 percent wool roving, soaked in Synthrapol (about a 1/4 cup, in 3 gallons of water). Using a 1% solution of Greener Shades dyes, I toned down the intense colors in most of these samples with the addition of black dye. I prepared 1% solutions, but since I was handpainting the wool, I ended up using more than what I had prepared, and had to go back in the kitchen to prepare more dye to finish all 350 grams (roughly 2/3 pound fiber). The one labelled "Parakeet" had no black in its colors. These are the pure hues resulting from the dye stock, with approximately a two to one ratio of dye stock to fiber weight. This was a purely experimental day, one meant for me to get comfortable with the dyes, and the resulting colors. Next, I would like to play with color schemes, tints, shades and more color theory! I notice that I have to be careful not to felt the fiber as I apply the dye with the stencil brushes. The fibers were painted on top of Saran Wrap, sealed up and rolled, then put in a steam bath over the stove, using a canning kettle with a wire insert to lay the rolls on as they steam. This took about a half hour to complete. The rolls were left to cool down, then unwrapped, rinsed gently with water, and hung to dry, after fluffing slightly with my fingertips. They are so pretty, I hate to use them! Coming up with the names for these color ways was so much fun. The one called "Mountaintop" was so named because my daughter and I had just recently visited the summit of Mount Graylock in the Berkshire Mountains of Massachusetts. These colors were all around us as we looked around at the vista that lay before us, up in the clouds! I will have fond memories of that day forever!




Subscribe to:
Posts (Atom)