
Tuesday, December 31, 2013
Lace Knitting Lessons
I am an art teacher. It is my chosen profession, and my main source of income. In addition, it is deeply satisfying on a number of levels to me personally, as an artist, and a human being. I love the energy, enthusiasm and joy the children bring to my classroom, and thereby, my life. My students drive me forward, as a teacher and an artist, to explore the what-ifs, and stay hungry for new knowledge. Did I mention that it is exhausting? Or that there are those days that things don't always go as planned? The days are, without a doubt, filled to the brim with unexpected turns, and lots of great art making. I wistfully think about what my life would be like as a full time fiber artist/shepherd , happily spending my days spinning, weaving, art quilting, tending the flock, and generally producing as many artworks as my heart desires. I, instead, plan and execute what I can during my non-teaching hours, after school, and on weekends and vacation time. I awaken at 4:30 a.m., have my ritual cup of jasmine jade tea, pore over my reading materials, which consist of several knitting, spinning and weaving magazines, art quilting and historic needlework publications. My most energetic hours are these, in the wee hours of the morning. After work, I prep dinner, do a little working out, and settle in for some light knitting or spinning, generally. Weekends and vacation time are for the bigger project set-ups, re-grouping and reflective activity that keep me focused. This photo is the most recent knitting project I have undertaken. It is a lace shawl. My first. What a challenge. I have discovered much about myself in this process. I have ripped back on many occasions, made plenty of mistakes, and gotten irritated to the point of putting the shawl away for weeks at a time so that I would not have to look at it, or deal with it. I have asked myself on numerous occasions, whether I really like lace knitting or not. I have finally discovered, half way through this ambitious project, that I need to "read" my knitting. If I can do that, I will make fewer mistakes and feel more enjoyment from the process, which is the reason we do this thing called knitting anyway, right? I also know that I cannot do this kind of knitting with any distractions. I need to be able to be totally enveloped in the shawl, thinking, living, breathing the shawl. Lots of counting, checking the rows that came before to use as a point of reference for my new row accuracy. Whew! I cannot wait to be finished, sort of the way a mountain climber feels once he or she reaches the summit! Worth all that hard work. And maybe the next shawl will not be as challenging, since I will have all of this experience behind me!
Monday, August 19, 2013
Dyed Leicester Longwool Fleece
The colors below were dyed on Leicester Longwool that I purchased in the grease at the New Hampshire Sheep and Wool Festival this spring. I scoured the fleece, then dried it on the screens. I used Greener Shades dyes, which come in a kit. I purchased mine from Knit Picks. It is about $35 or so, and the kit dyes up to 13 pounds of fiber. The directions leave a lot to be desired. I would not call the set of dyes a kit , at all, because of the lack of clear directions, but, nevertheless, the dyes are excellent, and I used Deb Menz's "Dyeing in the Kitchen" DVD to get me started with how to proceed with mixing the dyes up and using them. The colors are clear and strong, and very mix able. I obtained some clear, beautiful true colors when I mixed them together, and when toning them down with black, for deeper shades. I found it best to purchase a large plastic tub to put all of my dye supplies and equipment in. This way, when I want to have a dye day, all I have to do is pull out the tub, and everything I need is at my fingertips.


You will need:
A digital scale that can weigh In grams and pounds
Plastic table cover
Buckets
Measuring spoons
Smooth sided clear plastic cups
Colanders
Plastic knives or stirring implements of some kind
Sponges and rags for wiping spills
Rubber gloves
A thermometer
Pots with lids
9x13 roasting pan--good for casserole dyeing
Saran Wrap
Synthrapol
Stencil brushes (large work best)
Plastic syringes without the needle (you can get these at farm supply stores) that measure in milliliters or cc's (these are both the same)
Canning jar steamer kettle with wire rack insert
Dyes stock containers (I use the plastic disposables with good fitting lids, that hold 3-4 cups of liquid)
These items will get you started. You may wish to add others as you go. I store my tub in the basement, where it is cool, and I keep the extra dyestuff there as well, rather than in the attic. I keep a couple of old house screens in my basement to dry the fibers on out of doors on a sunny day. Most of my dyeing days are in the summer and fall, when the weather is nice, and I can make a mess outdoors and not have to worry about it! Then, I have beautiful dyed fiber to work with all winter long at my spinning wheel. The photos below show some of the rich colors I got on this fleece. I had to be very careful when dyeing these locks, felting can be an issue when working with them and the hot dye liquor! Avoid agitation, and you should be fine. I can't wait to card and spin some of these locks into yarns! I can envision some interesting art yarns with these....
Sunday, August 11, 2013
August Dye Day!
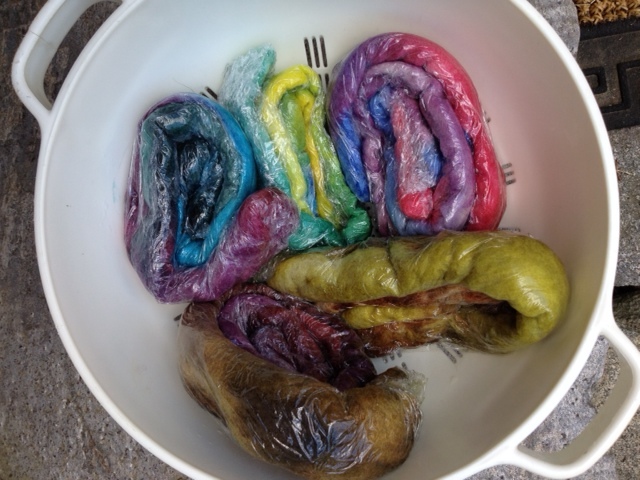
A sunny, dry day, perfect for outdoor dyeing. Today was so much fun, and I now have bags full of wonderful color ways to experiment spinning with! I used about 2/3 pound of 100 percent wool roving, soaked in Synthrapol (about a 1/4 cup, in 3 gallons of water). Using a 1% solution of Greener Shades dyes, I toned down the intense colors in most of these samples with the addition of black dye. I prepared 1% solutions, but since I was handpainting the wool, I ended up using more than what I had prepared, and had to go back in the kitchen to prepare more dye to finish all 350 grams (roughly 2/3 pound fiber). The one labelled "Parakeet" had no black in its colors. These are the pure hues resulting from the dye stock, with approximately a two to one ratio of dye stock to fiber weight. This was a purely experimental day, one meant for me to get comfortable with the dyes, and the resulting colors. Next, I would like to play with color schemes, tints, shades and more color theory! I notice that I have to be careful not to felt the fiber as I apply the dye with the stencil brushes. The fibers were painted on top of Saran Wrap, sealed up and rolled, then put in a steam bath over the stove, using a canning kettle with a wire insert to lay the rolls on as they steam. This took about a half hour to complete. The rolls were left to cool down, then unwrapped, rinsed gently with water, and hung to dry, after fluffing slightly with my fingertips. They are so pretty, I hate to use them! Coming up with the names for these color ways was so much fun. The one called "Mountaintop" was so named because my daughter and I had just recently visited the summit of Mount Graylock in the Berkshire Mountains of Massachusetts. These colors were all around us as we looked around at the vista that lay before us, up in the clouds! I will have fond memories of that day forever!


Sunday, July 21, 2013
Log Cabin Magic 2
Sock yarn is being put to good use in this project. Set at 10 ends per inch, the log cabin pattern is visible, but doesn't scream at you. I have discovered that you need to choose the right colors in the right values for log cabin to be effective. Log cabin is something i have not tried before, and it was fun experimenting with it. The sett is OK at 10 per inch, but 12 would have been perfect. Cloth is a bit sleazy, but once fulled, should be fine.....the intended end use is a cosmetic bag, with a lining, so I did not want the fabric to be too stiff, either. Love this little Knitters Loom by Ashford. I bought it through Paradise Fibers in California. Their prices are better than most, and they offer 5 dollar shipping (on equipment like floor looms, too!). They have a rewards system where you can earn points toward credit on future purchases, so I am taking advantage of that, since I am in the market for an 8 harness floor loom (just purchased from Paradise), and a Lendrum spinning wheel (hopefully by end of summer). Their customer service is exceptional, shipping very prompt, and with the specials they offer (such as $200 worth of free equipment and supplies with the purchase of the floor loom, on top of the point rewards) you can't go wrong. I selected a trolley for the loom I bought, so I can transport it with ease, and a shuttle holder that attaches to the front of the loom (indispensable), as well as some weaving yarn and shuttles. Good deal!


Tuesday, July 16, 2013
Garden Inspiration for Fiber (and other) Artists....
As you can see, the garden is flanked by a male and female holly. They required pruning this spring after the deer munched the lower branches.....these photos were taken on a hot July morning, before I weeded the beds. A storm passed through last week and knocked down the tomato plants, so I have plenty of work to do here this week tending my plants! The coneflowers, tithonia torch (orange flowers) and cosmos look striking together. I would not have thought about combining pink and orange, but it warrants some exploration in my knitting, weaving and dyeing work.......the garden provides endless inspiration to me as an artist, and is a haven of beauty, a place I retreat to whenever I need to think, relax or just be. I actually prefer gardening to housework, if truth be told....!


Monday, July 15, 2013
Merino Tencel yarn!
Here is a sample skein of 50/50 Tencel and merino wool yarn spun up to a sport weight. Approximately one half pound of top I had purchased at the Ct Sheep Breeders Association Wool Festival last spring in Rockville, Ct, has finally made it to the yarn stage! It was a new experience, as the Tencel was not the easiest fiber to work with. I spun it Z, and plied it S, using a modified long draw, after trying several methods, including a worsted style spin, but I was fighting it the whole time, until I tried the modified long draw. This top had a very distinct direction for spinning. When I tried spinning from one end of the top, it was harder to draw out, but when I flipped it end for end and spun from the opposite direction, it flowed more easily. Can't wait to try some dyeing....Tencel accepts dye very easily, and I am sure it will yield some intense colors! Perhaps a shawlette from this, as it has beautiful drape.

Three Cheers for "Ply" Magazine!
So excited to have stumbled upon the new magazine for handspinners. Entitled "Ply", it is a glossy, beautifully photographed publication. The articles are relevant, and a perfect fit for those interested in spinning and knitting--intrepid individuals wishing to learn more and develop skills. I read it cover to cover, then immediately sent in my subscription! Can't wait for the next issue. Ply magazine has a website, www.plymagazine.com. With Jacey Boggs as editor in chief, you can't go wrong! So happy I don't have to rely on the only magazine previously on the market that was so flimsy, you could blow your nose with the pages......!
Websites, Blogs and Other Interesting Tidbits.......
The Knitter's Life List by Gwen Steeg
Coastal Knits by Alana Dakos and Hannah Fettig
Juju's Loops by Juju Vail and Susan Cropper
These books I found to be exceptional. Coastal Coastal Knits has very wearable patterns for shawls, sweaters, hats, cowls and mitts. Not lots, I think there are about 10 patterns in all, but there is not one in the bunch I would not want to make! The authors live on opposite shores, one in California, the other, Maine. They use the surrounding environments to inspire their designs. Naturally, the colors are sea greens and blues, lovely rich browns and grays, and the designs have an organic beauty that is truly inspirational! Lots of photos of the land, seascapes and details of things like mustard colored lichen growing on gray rocks provide further inspiration for us fiber artists. One pattern that I particularly like is called the "gnarled oak cardigan". It is shown in a rich moss green, with a cabled oak leaf design at the neckline. The lines are clean, the details enchanting. The "sand and sea" shawlette has a crescent shape knit up in stockinet with a subtly variegated grayed green and brown yarn. The edge is knit in a feather and fan pattern, with an ocean blue color way, reminiscent of fluttering ocean waves. What I really like about this book is that it gives the yarn information used in the sample, and alternate yarn based on Yarn Council Standards so that you can substitute, or spin up your own yarn to the specifications listed. For example, "1000 yards of fingering weight yarn". Gauge information is also listed, naturally. You could spin up and dye your own color ways for these patterns. Highly recommend this one!
Juju's Loops is a Bohemian themed selection of the prettiest, most feminine patterns I have seen. Mostly shawls, and shawlettes, sweaters, cowls, and mitts, these items are beautifully photographed, with explicit directions. The authors have included a few additional patterns for you to download free on the computer from their website. A visit to the site is not to be missed! Lots of inspirational there, as well, and other free patterns to see, also. The book is small in size, but packed with wearable, charming patterns and gorgeous photography, all presented in a sturdy, glossy quality publication.
The Knitter's Life List is a hefty paperback book, filled with lists of things to see, do, learn, explore. It is not so much a pattern book as it is an inspirational powerhouse of information collected in one place, to aid intrepid knitters on their search for new avenues to explore. Lots of photos, illustrations, techniques and tips, huge resource section in the back for further reading, fiber personalities to meet, (or at least read up on), articles like "Freeing up your inner knitter", for those who might consider designing their own patterns, or trying free form knitting, also abound. Dyeing, embroidery, spinning, historical knitting, are only a few topics covered in this fabulous compilation. Again, highly recommend this for those with an insatiable appetite for fiber knowledge along the knitting spinning spectrum.
Sunday, July 7, 2013
Log Cabin Magic
I have finally finished a rigid heddle sampler, one that I had created on my Schacht "Flip Rigid Heddle Loom"! I explored many different hand controlled loom techniques from Brooks Bouquet to Danish Medallion to Soumak and Rya. This little loom is a powerhouse, and has taken a front seat in my weaving explorations. I am challenging myself to carry on with my personal (and thereby professional) development as an artist, by working with various looms and new techniques and processes this year, to become versed in as many avenues of textile making as I can. This project on the warping board is a 2 yard warp in gray and light blue. The weave, though very simple (plain weave, in fact), looks complex when completed, because the order of the colored warp threads are switched as they are threaded through the reed, to create the appearance of alternating blocks of stripes. I have chosen sock yarn to play with, as I have inherited a large quantity from my mother in law, who, as a sock machine knitter, had scads of sock yarn in many color ways, and I thought, what could I do with all of this? So, I am warping up the rigid heddle loom for some Log Cabin Magic! Can't wait to get started! Will post photos of the resulting experiments soon.....

Thursday, May 16, 2013
New Hampshire State Sheep and Wool
We took a trip last weekend to the New Hampshire State Sheep and Wool Festival in Deerfield, NH. Spent a full morning there, lots to see, many vendors in a number of buildings. About 120, as I recall hearing. Many vendors selling yarn, some processed wool fiber, some had fleeces to sell. Not enough equipment and supplies for us fiber artists at these shows. I am a weaver and Handspinner. I want to see lots of spinning wheels, combs, tools, plenty of fiber! Not commercial yarns. I make my own, remember? I went with a list of about 10 items I was looking for, found 2 of them. One being Power Scour, for washing fiber. One vendor had some, so I bought a refill. I went looking for several fleece types, found none. Very disappointing fleece sale. Plenty of Romney, and Lincoln Longwool, some Shetland, too....I did find a Finnish Landrace ( a.k.a. Finnsheep). Lovely soft, fine fleece. Not crisp or bouncy, this is softer. Cannot wait to process it! It is very white--a nice cool bright white. Lots of ideas for that. I had planned on taking photos of the show, but I completely forgot, I was so busy looking things over! They had an Alpaca Fest in one of the buildings, we didn't have time to see that, but perhaps next year. It warrants a trip back! Not as big as Rhinebeck, certainly, but a nice size show, nevertheless. I will put posts about the fleeces I bought there, as I work with them! Can't wait....
The Garden
Beautiful things are beginning to grow here at Huntington House. The garden is coming to life. Tulips, violets, daffodils and peonies are pushing their way up through the dirt! Our goats provide us with not only wool, and laughter from watching their antics, but they make wonderful compost for the garden! I have put many cartloads on the herb garden this spring, and it is like gold to us naturalists! I've been poring over my gardening books....."Cottage Gardens" is a favorite, as is "The Self Sufficient Gardener", and "Backyard Homesteading". One of my classic favorites is "Herbs" by Emily Tollie Meade, published in the 80's, it is a treasure trove of lavish photos and information about herb gardening. Highly recommend it. I have been dabbling in vegetables a bit, in the herb garden. It is so nice to go out on a warm summer evening, and pick fresh herbs for dinner, as well as tomatoes, zucchini, cukes and beans to round out a meal. Nothing better than fresh picked. My gardening ambitions always exceed my budget and my time. So, I often sit down with a good gardening book and a glass of iced tea (with peppermint picked from the herb garden, I might add!), and dream of what I could do, with lots of time and lots of money. I would like to get my water garden up and running this year. It has been laying fallow for two years. Perhaps this weekend......


Friday, April 19, 2013
Fleece storage and management
Below are samples of 2 more fleeces that I scoured this week, in an effort to get caught up on all of the fleece that I have been purchasing in the past 10 or so years! They are now clean, packed into plastic storage tubs, labelled, and ready for future fiber spinning and felting! These two are a gray Karakul x Jacob x Coopworth blend on the left, and a fabulous creamy white alpaca. I am in fiber art heaven! All of the tubs are labelled by breed and color. Some tubs have processed fiber in them, and are labelled accordingly. I made up a master list for all tubs and their contents, and I keep this in my studio, so that I know what is in my inventory at a glance. No more wondering, no more searching the property for that "fleece in question"-- so much easier. And, I no longer have to worry that the dirty fleeces are attracting pests, or that the suint is solidifying on the fibers rendering them useless. Happy day! I will be visiting the CT Sheep Breeders Fiber Festival April 27, in Rockville CT, and the NH State Sheep and Wool Festival in Deerfield, NH on May 11. Would like to find some Blue Faced Leicester and some Teesewater fleece. Polwarth top is on the list as well.

Thursday, April 18, 2013
Silk Fusion
These photos show the results of a day spent creating silk paper, also known as silk fusion. Our spinning guild, the Nutmeg Spinners Guild, hosted Robin Russo, a fiber artist and spinner from Vermont, for a day long workshop this past month. The number of inspiring color combinations from our members was astonishing! We used silk roving dyed in many colors, as well as silk mawata (also called silk hankies) and a myriad of embellishments ranging from dyed moth cocoons to hydrangea leaves to glitter. The silk roving was laid out on nylon netting (the cheap kind from the craft store, used for bridal veiling) in layers. Next, embellishments were placed on top (see photos). The top was covered with netting. You then brush on either textile medium, for a softer hand, or clear acrylic varnish for a stiffer end result (depending on your intended use for the paper). The medium is diluted about 1:1 with water. Mod Podge can also be used, but may not be as permanent. Work the medium through all the layers of the netting/silk sandwich with a brush, being careful to insure that it is worked in thoroughly, on both sides. It should be wet but not dripping wet. Lay out to dry completely before carefully removing the netting, which can be used several times. You can also see a photo of my silk paper used in a paper weaving with some metallic paper! Lots of possibilities. Origami, basket making, papercrafting, ornaments, bookmaking--the list is endless!


Saturday, March 30, 2013
Shearing Day 2013!
We clipped Black Jack today! Here he is, below, looking slim and trim! He took it well, was not a squirmy worm this time. We think he understood that it doesn't hurt, and my, we always feel so much better after the haircut! The second photo below is of Jack, with his twin brother Mackenzie cautiously inspecting the new haircut. We sprayed Jack with Bug Block, rubbed it in to the skin, using disposable rubber gloves to protect ourselves. He is being treated for lice (not uncommon), and he is bothered by them. We will be shearing Mack tomorrow. The girls, Violet and Luna, have been sprayed as well. Once we shear Mack, we will spray him as well. Then, the big job of disinfecting the goat shed will be next on the list. Empty the shed on a warm day in the morning, strip it completely, spray with Sevin, close it up, goats outside for the day while it dries, then fresh bedding in the evening when goats are allowed back in. What a job!


Friday, March 29, 2013
Can spring finally be arriving at Huntington House?
Can it be? The coldest, snowiest, cloudiest March ever.....in like a lion, out like a lamb? It is 52 degrees today, a warm watery sun up in the sky this March 29th...beautiful day. As I went to do chores this morning, I noticed the hyacinth poking their little green shoots up by the lamb here in the herb garden! What a true country dwellers treat! Mack, one of our Pygora goats, is beginning to blow off his winter down. Sadly, I lost this fleece, since I could not shear him when the fleece was ready to be taken, the end of January. Too cold out. Even inside the goat shed. I just recently invested in 2 Amish made goat coats. The next fleece WILL be harvested when ready, sometime in December or January. If you wait even 2 weeks from the time you see that the fleece is ready for harvesting, it will begin to mat and ultimately felt before blowing off. You can see in the photos below that the silvery down has started separating from the dark under coat. This undercoat is actually the guard hairs, wiry and coarse. These need to be separated before spinning the downy fleece. They will become the outer coat of the goat once the fleece comes off. The goat will wear this darker coat as the new downy fleece starts to come in over the summer. When the days start to get shorter, it signals the downy winter coat to start growing in in earnest! Lauren and I will begin clipping off the goats' fleeces, and put them in the compost bin this weekend. The boys will be sporting their new Amish blankets tomorrow night! This will keep them toasty until the warmer nights have arrived. They will look very different once they are shorn. I will post pictures soon!


Very Good Friday!
I scoured yet another fleece that I picked up for 6 dollars at the Connecticut Sheep Breeders Fiber Festival in Tolland, Ct several years ago. It is a "Heinz 57 variety fleece", that I purchased because of its soft, springy feel, and lovely silvery gray color. I noticed a small area of old bug infestation, removed that part, shook out the whole fleece to allow any dirt, chaff and "ABC" fiber (already been chewed! By the long gone bugs, that is....). I did not sort the fleece. I did remove the skirtings, and then gave it a pre soak in 125 degree water, in the sink. Then, I washed it in 3 batches, on top of the stove to get the temp up to about 140-150 degrees, with an appropriate amount of Power Scour. Love the light scent. This was followed by 2 rinses in hot tap water. Then, I rolled the gently squeezed out wool in a cushy towel to extract any remaining water ( see photos), and layer it out on the patio, on top of some old screens to air dry in the sun. There is a batch of 3rd clip yearling mohair next to the screen of gray wool in one of the photos. I had previously washed it, but it still felt a little greasy, and did not look as bright as the rest of the mohair I had washed from that fleece, in smaller batches! Next time I will wash smaller batches, it does make a difference when there is plenty of room for the dirty fiber to swish around in the water....the pot was too full, I guess! The mohair is squeaky clean, and as bright white and lustrous as it can be.


Saturday, March 23, 2013
Interesting blogs
Www.backstrapweaving.wordpress.com
Fabulous photos and scenery from South America! Very inspiring. I will add more as I find them.....
Fabulous photos and scenery from South America! Very inspiring. I will add more as I find them.....
Friday, March 8, 2013
Handspun Tunis Neckwarmer
The Tunis neck warmer is finished! The DK weight (light worsted size 3) yarn that I spun from it definitely has plenty of memory and is crisp enough to hold the neck warmer in place, aided by the 2x2 rib pattern. The yarn is soft enough for next to the skin wearability. I am so pleased with the process and the end result. And to think, I almost threw the fleece away, having found it packed away in my basement...who knew?
Here are the pattern directions:
You need about 2 ounces of DK weight yarn for this project.
Cast on 112 stitches with size 5 needles. Gauge is about 5-1/2 sts to the inch.
Work in knit 2 purl 2 ribbing for about an inch. On the next row, work 4 stitches in pattern, then yarn over, knit 2 together. This will be the first buttonhole. Finish the row in pattern, k2p2. Continue on until neck warmer is about 3 inches, and then work another buttonhole as before, knitting 4 sts at the beginning of the row, then yarn over, K2 together. Continuing on until the work measures about 5 inches, work the third buttonhole. When piece is about 6 inches, cast off. Weave in ends, place buttons and sew on corresponding to the knit buttonholes you made. I like to wear it with the bottom button left open, but it works either way. I would like to make these up to give as gifts. They would be beautiful in dyed color ways, with variegated handspun yarn....or pretty in a commercially produced yarn as well. I am very partial to handspun, though, and I enjoy the process of selecting the fleeces, using their best attributes for the projects I have in mind, sorting the wool, cleaning and prepping it, sampling yarn production on my spinning wheel, and creating the finished work. The possibilities are endless!
Subscribe to:
Comments (Atom)